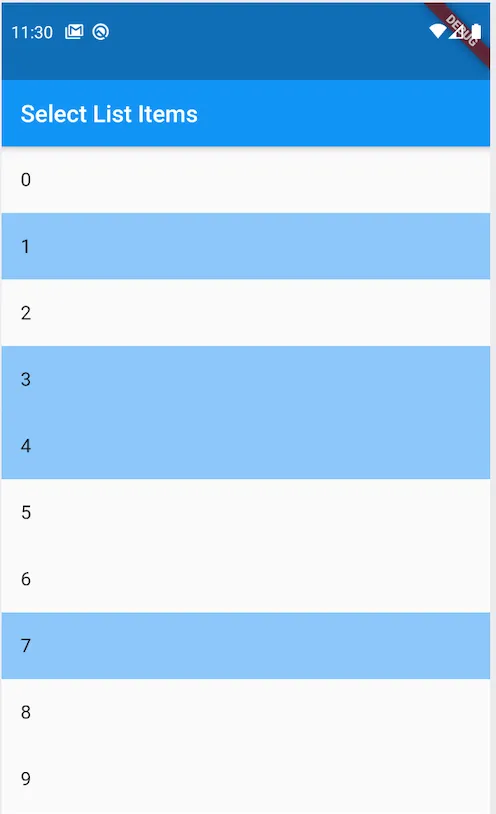
This article will help, if you are developing a flutter application that needs to select the list items, like in a chat-app to delete the selected chats, or in a todo-app to remove or tick the selected todos.

Selected list items
Step 1: Add a list view
Place your ListView inside a Stateful Widget.
This step is although not necessary if you are using some state managements other than setState() like Bloc, or Provider.
I have chosen the setState() state management with Stateful Widget for simplicity.
class SelectListItem extends StatefulWidget{
       @override
       _SelectListItemState createState() => _SelectListItemState();
}

class _SelectListItemState extends State<SelectListItem>{
       @override
       Widget build(BuildContext context) {
              return MaterialApp(
              home: Scaffold(
              appBar: AppBar(title: Text(‘Select List Items’)),
              body: ListView(),
       }
}
Step 2: Add items to your ListView
Here I’m using the ListView builder (instead of ListView above) to generate list items for me, which are nothing but text widgets displaying the index of the builder function.
body: ListView.builder(
    itemCount: 10,
    itemBuilder: (context, index) => ListTile(title: Text(‘$index’)),
),
Step 3: Store selected items
Create a list variable to store the data of selected list-items.
Remember! the data you are storing must be unique to a list-item. This will act as an identifier to select or unselect a specific list-item.
In my case, the index of each item would be unique. So, I’m creating a list of integers to store selected list items.
List<int> _selectedItems = List<int>();
Step 4: Select item on long press
Now add a list item to our selected items list on ListTile long press and change the state (used for changing the state in step 6)
onLongPress: (){
       if(!_selectedItems.contains(index)){
              setState(() => _selectedItems.add(index));
       }
},
Step 5: Unselect item on tap
Add the onTap function of ListTile to remove the selected item and change the state (used for changing the state in the next step)
onTap: (){
       if(_selectedItems.contains(index)){
              setState(() => _selectedItems.removeWhere((val) => val == index));
       }
},
Step 6: Highlight selected list items
Wrap the ListTile in a Container to visually separate the selected items from the unselected ones, by changing the color of the Container.
Container(
       color: (_selectedItems.contains(index))
              ? Colors.blue.withOpacity(0.5)
              : Colors.transparent,
       child: ListTile( …… )
);
All Done! Now you can use the _selectedItems list, to perform some operation on selected items.
Complete Source Code
import 'package:flutter/material.dart';

void main() => runApp(const SelectListItemApp());

class SelectListItemApp extends StatefulWidget {
  const SelectListItemApp({super.key});

  @override
  _SelectListItemAppState createState() => _SelectListItemAppState();
}

class _SelectListItemAppState extends State<SelectListItemApp> {
  final List<int> _selectedItems = [];

  @override
  Widget build(BuildContext context) {
    return MaterialApp(
      home: Scaffold(
        appBar: AppBar(title: const Text('Select List Item')),
        body: ListView.builder(
          itemCount: 10,
          itemBuilder: (context, index) => Container(
            color: (_selectedItems.contains(index))
                ? Colors.blue.withOpacity(0.5)
                : Colors.transparent,
            child: ListTile(
              onTap: () {
                if (_selectedItems.contains(index)) {
                  setState(
                      () => _selectedItems.removeWhere((val) => val == index));
                }
              },
              onLongPress: () {
                if (!_selectedItems.contains(index)) {
                  setState(() => _selectedItems.add(index));
                }
              },
              title: Text('$index'),
            ),
          ),
        ),
      ),
    );
  }
}
Thank you for reading this article. I hope it helped you :-)


