Hey, have you ever wanted a date-picker in your app but not in a dialog box? And you tried all the dart packages out there but cannot change their UIs as per your requirements? I had struck on these problems too! And came out with a solution to build a custom calendar and want to share it with you all :-)
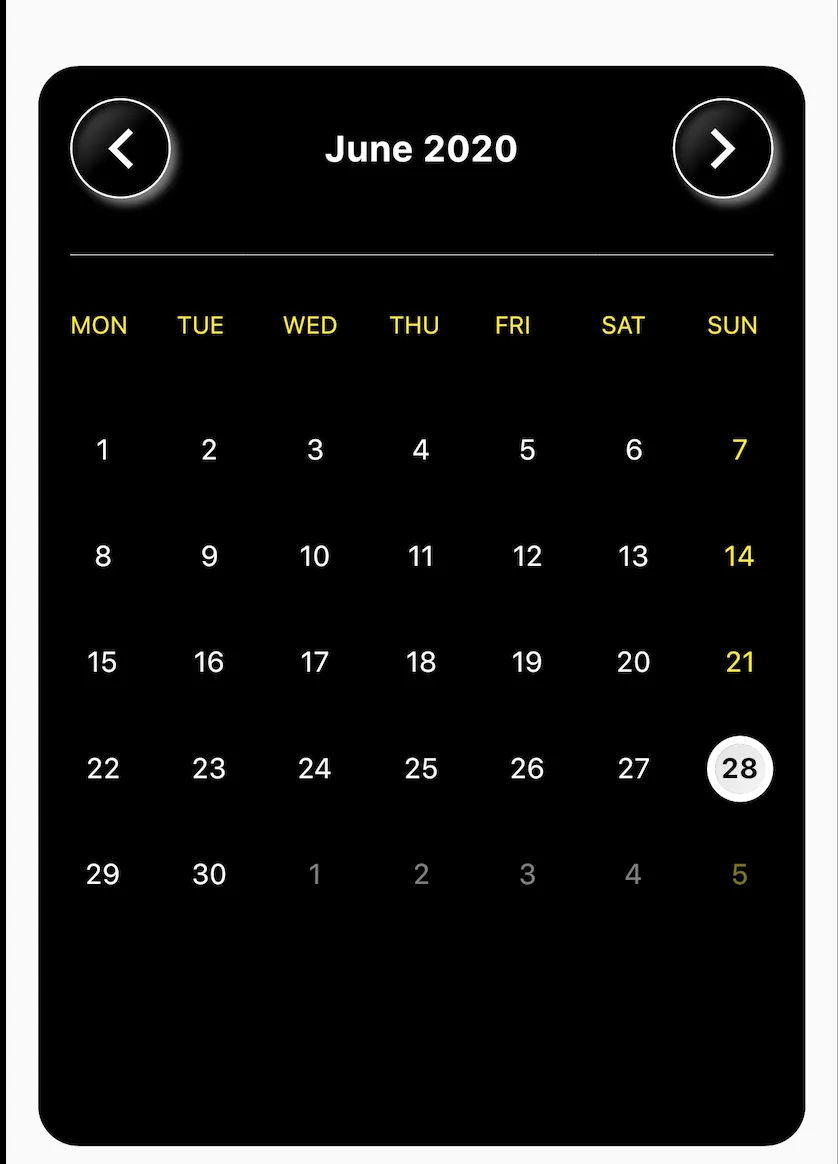
Customized calender in flutter
So, let’s begin our journey! First, create a new flutter project or use an existing one.
Ok, first of all, let’s figure out what data is required. So, the calendar is all about dates, Right? We have to calculate the days of a month in a year and on which weekdays they occur. That’s pretty much all of the calculations we required. Along with this, we might want to show unfilled weekdays at the start and end of the month’s calendar with the dates of the previous and next month respectively.
Create a model class
Here I have created a model class for each day to contain all this information.
class Calendar{
  final DateTime date;
  final bool thisMonth;
  final bool prevMonth;
  final bool nextMonth;
Calendar({
    this.date,
    this.thisMonth = false,
    this.prevMonth = false,
    this.nextMonth = false
  });
}
Create a class for all calendar-related methods
class CustomCalendar{
  // number of days in month
  //[JAN, FEB, MAR, APR, MAY, JUN, JUL, AUG, SEP, OCT, NOV, DEC]
  final List<int> _monthDays = [31, 28, 31, 30, 31, 30, 31, 31, 30, 31, 30, 31];

  /// check for leap year
  bool _isLeapYear(int year){
    if(year % 4 == 0){
      if(year % 100 == 0){
        if(year % 400 == 0) return true;
        return false;
      }
      return true;
    }
    return false;
  }
}
This class contains a list of days for each month in order. I have used 28 days for February, but don’t worry it will be handled in later stages. Also, it contains a method for checking whether a year is a leap or not, which is a universal known formula for checking :-)
For some, weeks may start from SUNDAY and for others from MONDAY.
enum StartWeekDay {sunday, monday}
Now the complex calculations begin! Complex or not you can decide at the end :-)
Get date with its week day of a month
Here is a method that will calculate all the days of a month in a year with their occurrence in weekdays, place them in sequence as to display in the month’s calendar, and returns the list of sequence.
// get the month calendar
/// month is between from 1-12 (1 for January and 12 for December)
List<Calendar> getMonthCalendar(
       int month,
       int year, {
       StartWeekDay startWeekDay = StartWeekDay.sunday,
}){
       // validate
       if(year == null || month == null || month < 1 || month > 12){
              throw ArgumentError('Invalid year or month');
       }

       List<Calendar> calendar = List<Calendar>();

       // get no. of days in the month
       // month-1 because _monthDays starts from index 0
       // and month starts from 1
       int totalDays = _monthDays[month - 1];

       // if this is a leap year and the month is february,
       // increment the total days by 1
       if(_isLeapYear(year) && month == DateTime.february) totalDays++;

       // get days for this month
       for(int i=0; i<totalDays; i++){
              calendar.add(Calendar(
                     // i+1 because day starts from 1 in DateTime class
                     date: DateTime(year, month, i+1),
                     thisMonth: true,
              ));
         }
}
In this class, there is a list called calendar which will return us all the days of the month in a sequence and it is of type Calendar which is a model class we have created as our first step.
Well, that’s it! We got all the days in a sequence. Now we are done, right? Yeah, but every month won’t start from Monday or Sunday and ends with Sunday or Saturday. NEVER! We need to fill those missing spots at the start and at the end with previous and next month days respectively.
Add previous and next month's dates in the unfilled positions at the start & end respectively
Here is the calculation to fill missing spots at the start with the previous month’s days. Place these lines of code, right before the closing of the getMonthCalendar method.
// used for previous and next month's calendar days
int otherYear;
int otherMonth;
int leftDays;

// fill the unfilled starting weekdays of this month
// with the previous month days
if(
 (startWeekDay == StartWeekDay.sunday &&
   calendar.first.date.weekday != DateTime.sunday) ||
 (startWeekDay == StartWeekDay.monday &&
   calendar.first.date.weekday != DateTime.monday)
 ){
   // if this month is january,
   // then previous month would be decemeber of previous year
   if(month == DateTime.january){
     otherMonth = DateTime.december;
     otherYear = year-1;
   }
   else{
    otherMonth = month - 1;
    otherYear = year;
   }

   // month-1 because _monthDays starts from index 0
   // and month starts from 1
   totalDays = _monthDays[otherMonth - 1];
   if(_isLeapYear(otherYear) && otherMonth == DateTime.february)
      totalDays++;
   leftDays = totalDays - calendar.first.date.weekday +
     ((startWeekDay == StartWeekDay.sunday) ? 0 : 1);

   for(int i=totalDays; i>leftDays; i--){
     // add days to the start of the list to maintain the sequence
     calendar.insert(0,
       Calendar(
         date: DateTime(otherYear, otherMonth, i),
         prevMonth: true,
        ),
     );
   }
}
That was hell a lot of conditions and calculations. But I did my best on putting comments to the code to make it understandable. You may be wondering how the leftDays are calculated, but honestly, I did it in a copy with a pen and got the pattern right and now don’t have an explanation for that. But I assure you that it was simple and everyone can easily figure out this pattern (and even better than it), just give it a try!
Now moving to the other part of the calculation and the last one, to fill the missing spots at the end with the days of next month. Place these lines of code, right before the closing of the getMonthCalendar method.
// fill the unfilled ending weekdays of this month
// with the next month days
if(
  (startWeekDay == StartWeekDay.sunday &&
    calendar.last.date.weekday != DateTime.saturday) ||
  (startWeekDay == StartWeekDay.monday &&
    calendar.last.date.weekday != DateTime.sunday)
){
  // if this month is december,
  // then next month would be january of next year
  if(month == DateTime.december){
    otherMonth = DateTime.january;
    otherYear = year+1;
  }
  else{
    otherMonth = month+1;
    otherYear = year;
  }
  // month-1 because _monthDays starts from index 0
  // and month starts from 1
  totalDays = _monthDays[otherMonth-1];
  if(_isLeapYear(otherYear) && otherMonth == DateTime.february)
    totalDays++;
  leftDays = 7 - calendar.last.date.weekday -
    ((startWeekDay == StartWeekDay.sunday) ? 1 : 0);
  if(leftDays == -1) leftDays = 6;
  for(int i=0; i<leftDays; i++){
    calendar.add(
      Calendar(
        date: DateTime(otherYear, otherMonth, i+1),
        nextMonth: true,
      ),
    );
  }
}
Now just return this list of our calendar else all our hard work will go to vain. Place these lines of code, right before the closing of the getMonthCalendar method. return calendar;
That was all our calculation part! Now let’s do some UI stuff :-)
Set the variables and do some initState job
class MyApp extends StatefulWidget {
  @override
  _MyAppState createState() => _MyAppState();
}
class _MyAppState extends State<MyApp> {
  DateTime _currentDateTime;
  DateTime _selectedDateTime;
  List<Calendar> _sequentialDates;
  int midYear;
  final List<String> _weekDays =
    ['MON', 'TUE', 'WED', 'THU', 'FRI', 'SAT', 'SUN'];
  final List<String> _monthNames =
    ['January', 'February', 'March', 'April', 'May', 'June', 'July',
     'August', 'September', 'October', 'November', 'December'];
  @override
  void initState() {
    super.initState();
    final date = DateTime.now();
    _currentDateTime = DateTime(date.year, date.month);
    _selectedDateTime = DateTime(date.year, date.month, date.day);
    WidgetsBinding.instance.addPostFrameCallback((timeStamp) {
     setState(() => _getCalendar());
    });
  }
  // get calendar for current month
  void _getCalendar(){
    _sequentialDates =
      CustomCalendar().getMonthCalendar(_currentDateTime.month,
        _currentDateTime.year, startWeekDay: StartWeekDay.monday);
  }
  @verride
  Widget build(BuildContext context) {
    return Scaffold(
      body: Center(
        child: Container(
          margin: EdgeInsets.all(16),
          padding: EdgeInsets.all(16),
          height: MediaQuery.of(context).size.height * 0.6,
          decoration: BoxDecoration(
            color: Colors.black,
            borderRadius: BorderRadius.circular(20),
          ),
          child: _datesView() // to be added in next step
        ),
      ),
    );
  }
}
Add months toggle button
Add the calendar body to display dates of the month and toggle buttons to move to the next and previous months.
// dates view
Widget _datesView(){
  return Column(
    mainAxisSize: MainAxisSize.min,
      children: <Widget>[
        // header
        Row(
          children: <Widget>[
            // prev month button
            _toggleBtn(false),
            // month and year
            Expanded(
              child: InkWell(
                onTap: (){
                  setState((){
                    // explained in later stages
                    _currentView = CalendarViews.months
                  });
                },
                child: Center(
                  child: Text(
                    '${_monthNames[_currentDateTime.month-1]}
                     ${_currentDateTime.year}',
                     style: TextStyle(
                       color: Colors.white,
                       fontSize: 18,
                       fontWeight: FontWeight.w700
                     ),
                   ),
                 ),
               ),
             ),
             // next month button
             _toggleBtn(true),
           ],
         ),
         SizedBox(height: 20,),
         Divider(color: Colors.white,),
         SizedBox(height: 20,),
         Flexible(child: _calendarBody()),
      ],
   );
}
// next / prev month buttons
Widget _toggleBtn(bool next) {
  return InkWell(
    // explained in later stages
    onTap: (){
      if(_currentView == CalendarViews.dates){
        setState(() => (next) ? _getNextMonth() : _getPrevMonth());
      }
      else if(_currentView == CalendarViews.year){
        if(next){
          midYear = (midYear == null)
            ? _currentDateTime.year + 9 : midYear + 9;
        }
        else{
          midYear = (midYear == null)
            ? _currentDateTime.year - 9 : midYear - 9;
        }
        setState(() {});
      }
    },
    child: Container(
      width: 50,
      height: 50,
      decoration: BoxDecoration(
      borderRadius: BorderRadius.circular(25),
      border: Border.all(color: Colors.white),
      boxShadow: [
        BoxShadow(
          color: Colors.white.withOpacity(0.5),
          offset: Offset(3, 3),
          blurRadius: 3,
          spreadRadius: 0,
        ),
      ],
      gradient: LinearGradient(
        colors: [Colors.black, Colors.black.withOpacity(0.1)],
        stops: [0.5, 1],
        begin: Alignment.bottomRight,
        end: Alignment.topLeft,
      )
    ),
    child: Icon((next)
      ? Icons.arrow_forward_ios : Icons.arrow_back_ios,
      color: Colors.white,),
    ),
  );
}
// calendar body
Widget _calendarBody() {
  if(_sequentialDates == null) return Container();
  return GridView.builder(
    shrinkWrap: true,
    padding: EdgeInsets.zero,
    itemCount: _sequentialDates.length + 7,
    gridDelegate: SliverGridDelegateWithFixedCrossAxisCount(
      mainAxisSpacing: 20,
      crossAxisCount: 7,
      crossAxisSpacing: 20,
    ),
    itemBuilder: (context, index){
      if(index < 7) return _weekDayTitle(index);
      if(_sequentialDates[index - 7].date == _selectedDateTime)
        return _selector(_sequentialDates[index - 7]);
      return _calendarDates(_sequentialDates[index - 7]);
    },
  );
}
// calendar header
Widget _weekDayTitle(int index){
  return Text(_weekDays[index],
    style: TextStyle(color: Colors.yellow, fontSize: 12),);
}
// calendar element
Widget _calendarDates(Calendar calendarDate){
  return InkWell(
    onTap: (){
      if(_selectedDateTime != calendarDate.date){
        if(calendarDate.nextMonth){
          _getNextMonth();
        }
        else if(calendarDate.prevMonth){
          _getPrevMonth();
        }
        setState(() => _selectedDateTime = calendarDate.date);
     }
   },
   child: Center(
   child: Text(
     '${calendarDate.date.day}',
     style: TextStyle(
       color: (calendarDate.thisMonth)
         ? (calendarDate.date.weekday == DateTime.sunday)
         ? Colors.yellow : Colors.white
         : (calendarDate.date.weekday == DateTime.sunday)
         ? Colors.yellow.withOpacity(0.5)
         : Colors.white.withOpacity(0.5),
       ),
     )
   ),
 );
}
// date selector
Widget _selector(Calendar calendarDate) {
  return Container(
    width: 30,
    height: 30,
    decoration: BoxDecoration(
      color: Colors.white,
      borderRadius: BorderRadius.circular(50),
      border: Border.all(color: Colors.white, width: 4),
      gradient: LinearGradient(
        colors: [Colors.black.withOpacity(0.1), Colors.white],
        stops: [0.1, 1],
        begin: Alignment.topLeft,
        end: Alignment.bottomRight,
      ),
    ),
    child: Container(
      decoration: BoxDecoration(
        color: Colors.white.withOpacity(0.9),
        borderRadius: BorderRadius.circular(50),
      ),
      child: Center(
        child: Text(
          '${calendarDate.date.day}',
          style: TextStyle(
            color: Colors.black,
            fontWeight: FontWeight.w700
          ),
        ),
      ),
    ),
  );
}
Add methods to change the current date-time while navigating to the next or previous month.
// get next month calendar
void _getNextMonth(){
  if(_currentDateTime.month == 12) {
      _currentDateTime = DateTime(_currentDateTime.year+1, 1);
  }
  else{
      _currentDateTime = DateTime(_currentDateTime.year,
           _currentDateTime.month+1);
  }
  _getCalendar();
}
// get previous month calendar
void _getPrevMonth(){
  if(_currentDateTime.month == 1){
      _currentDateTime = DateTime(_currentDateTime.year-1, 12);
  }
  else{
      _currentDateTime = DateTime(_currentDateTime.year,
          _currentDateTime.month-1);
  }
  _getCalendar();
}
Navigating through next/previous month using a button can be tiresome if we want to jump through many months and years.
We need 2 views on selecting a month and a year. Now, our calendar will have 3 views dates’ view, months’ view, and years’ view. Creating the enum for the same.
enum CalendarViews{ dates, months, year }
Also, we need to store the current view to display and it will change whenever the user selects the different views. So, creating a class variable in _MyAppState class with default view as dates view.
CalendarViews _currentView = CalendarViews.dates;
We will switch from dates view to months view by clicking on the header of dates view. The onTap function of the dates’ view header is already configured above.
onTap: () => setState(() => _currentView = CalendarViews.months),
Create the months’ view
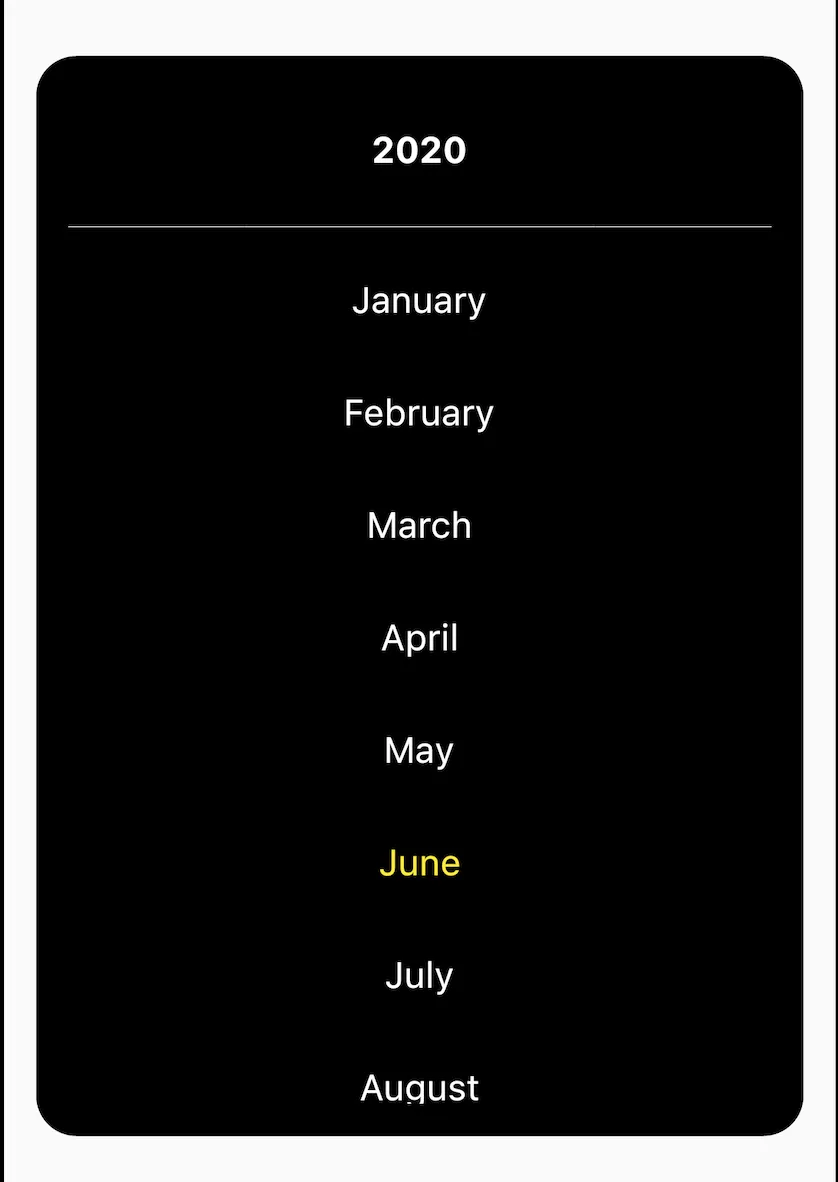
Months view
Create a widget for displaying the list of months. A user can select from these months.
// show months list
Widget _showMonthsList(){
  return Column(
    children: <Widget>[
      InkWell(
        onTap: (){
          setState((){
            //switch to years views
            _currentView = CalendarViews.year;
          });
        },
        child: Padding(
          padding: const EdgeInsets.all(20.0),
          child: Text('${_currentDateTime.year}',
            style: TextStyle(fontSize: 18,
              fontWeight: FontWeight.w700, color: Colors.white),
          ),
        ),
      ),
      Divider(color: Colors.white,),
      Expanded(
        child: ListView.builder(
          padding: EdgeInsets.zero,
          itemCount: _monthNames.length,
          itemBuilder: (context, index) => ListTile(
          onTap: (){
            // change month of currentDateTime
            _currentDateTime =
              DateTime(_currentDateTime.year, index+1);
            _getCalendar();
            // switch back to dates view
            setState(() => _currentView = CalendarViews.dates);
          },
          title: Center(
            child: Text(
              _monthNames[index],
              style: TextStyle(fontSize: 18,
                color: (index == _currentDateTime.month-1)
                  ? Colors.yellow : Colors.white),
            ),
          ),
        ),
      ),
    ),
   ],
 );
}
Users can navigate through the years by tapping the header of months’ view. The onTap function of months view header is already configured above.
Create the years’ view
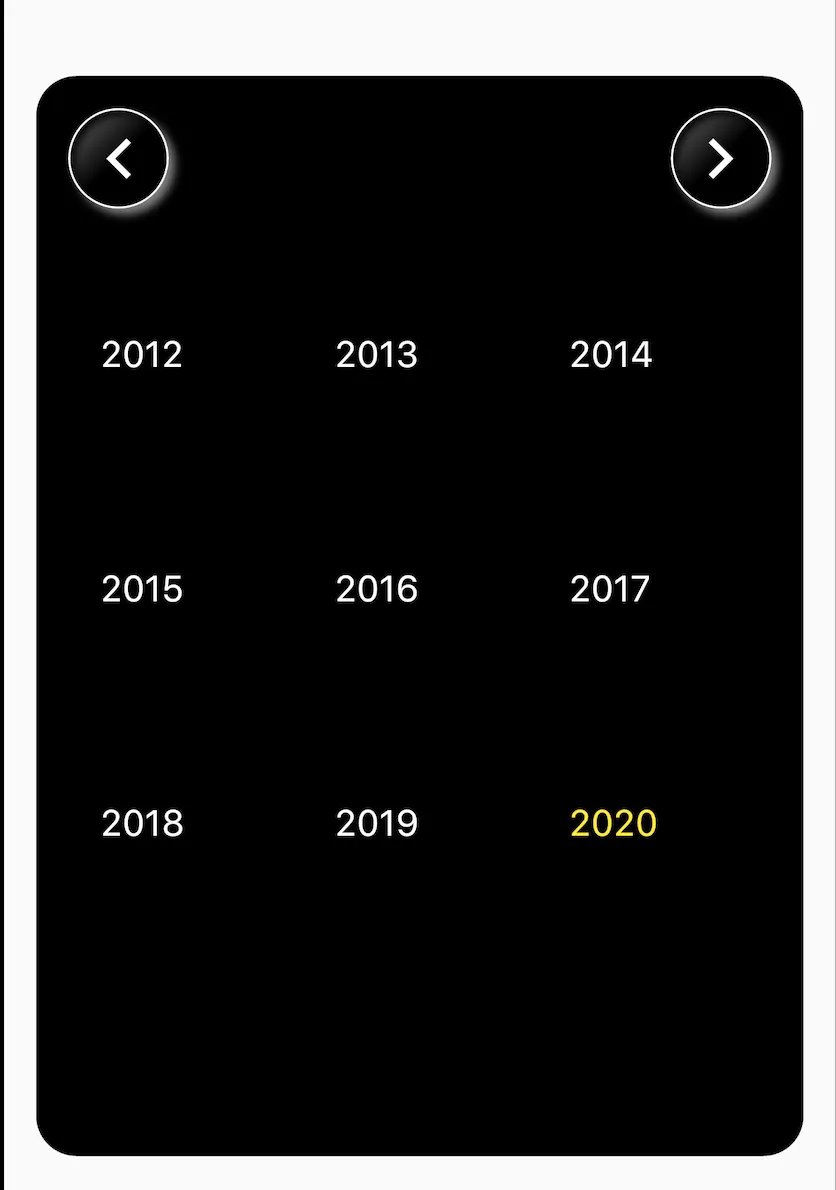
Years View
// years list views
Widget _yearsView(int midYear){
  return Column(
    children: <Widget>[
      Row(
        children: <Widget>[
          _toggleBtn(false),
          Spacer(),
          _toggleBtn(true),
         ],
       ),
       Expanded(
         child: GridView.builder(
           shrinkWrap: true,
           itemCount: 9,
           physics: NeverScrollableScrollPhysics(),
           gridDelegate: SliverGridDelegateWithFixedCrossAxisCount(
             crossAxisCount: 3,
           ),
           itemBuilder: (context, index){
             int thisYear;
             if(index < 4){
               thisYear = midYear - (4 - index);
             }
             else if(index > 4){
               thisYear = midYear + (index - 4);
             }
             else{
               thisYear = midYear;
             }
             return ListTile(
               onTap: (){
                 // change year of currentDateTime
                 _currentDateTime =
                   DateTime(thisYear, _currentDateTime.month);
                 _getCalendar();
                 // switch back to months view
                 setState(() =>
                   _currentView = CalendarViews.months);
               },
               title: Text(
                 '$thisYear',
                 style: TextStyle(fontSize: 18,
                   color: (thisYear == _currentDateTime.year)
                     ? Colors.yellow : Colors.white),
               ),
             );
           }
         ),
       ),
     ],
   );
}
The toggle buttons has two sets of functionalities. i. Toggling to next or previous month in dates view ii. Displaying previous or next sets of years in years view. These functionalities are already configured in onTap function of the toggle button above.
Now we have to place the condition for displaying the views according to the current view’s value. This will be done where we have simply given _datesView as the child for the container in the build method.
Updated build method
@override
Widget build(BuildContext context) {
  return Scaffold(
    body: Center(
      child: Container(
        margin: EdgeInsets.all(16),
        padding: EdgeInsets.all(16),
        height: MediaQuery.of(context).size.height * 0.6,
        decoration: BoxDecoration(
        color: Colors.black,
        borderRadius: BorderRadius.circular(20),
      ),
      child: (_currentView == CalendarViews.dates) ? _datesView()
        : (_currentView == CalendarViews.months) ? _showMonthsList()
        : _yearsView(midYear ?? _currentDateTime.year)
      ),
    ),
  );
}
That’s all! Now you have a custom calendar that can be molded to any extent as per your requirements :-)
Get the full source code from this link.